இன்வென்டரியில் புதிய கேடகரி சேர்த்தல்
இந்த வழிகாட்டி, ஸ்டாஃப் செயலி மூலம் இன்வென்டரியில் ஒரு புதிய கேடகரியை
எவ்வாறு சேர்க்கலாம் என்பதை படிப்படியாக விளக்குகிறது.
தொடங்குவதற்கு முன்
இந்த செயல்முறையை மேற்கொள்ளும் முன், பின்வரும் நிபந்தனைகள் பூர்த்தி செய்யப்பட்டிருக்க வேண்டும்:
- கேடகரி திருத்த அனுமதி (Edit access) கொண்ட ஸ்டாஃப் செயலி டெர்மினலில் உள்நுழைந்திருக்க வேண்டும்
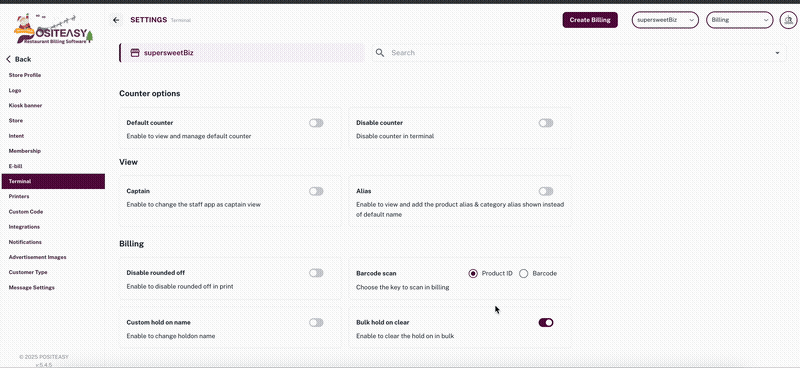
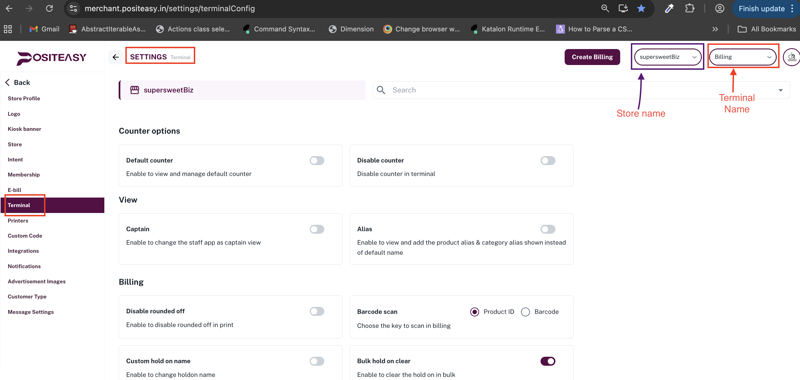
- மெர்சண்ட் செயலி:
- Terminal settings → Inventory management → Category
- அங்கு Add மற்றும் Edit அனுமதிகள் தேர்வு செய்யப்பட்டிருக்க வேண்டும்
caution
மெர்சண்ட் செயலி டெர்மினல் அமைப்புகளை மாற்றும் போது, சரியான டெர்மினல் தேர்வு செய்யப்பட்டுள்ளதா என்பதை கண்டிப்பாக சரிபார்க்க வேண்டும்.
படி 1: இன்வென்டரி மாட்யூலை திறத்தல்
- ஸ்டாஃப் செயலி, மேற்பகுதியில் உள்ள ப்ரொஃபைல் ஐகானை தேர்ந்தெடுக்கவும்
- இன்வென்டரி (inventory) → பேஸ் மெனு (Base menu)→ கேடகரி (category) என்பதைத் தேர்வு செய்யவும்
படி 2: புதிய கேடகரி சேர்க்கும் செயல்முறையை தொடங்குதல்
- Add Category
 பொத்தானைத் தேர்ந்தெடுக்கவும்
 - New Category என்ற படிவம் / உரையாடல் திரை திறக்கப்படும்
இன்வென்டரி → கேடகரி பட்டியல் திரையின் எடுத்துக்காட்டு
அடிப்படை விவரங்களுடன் புதிய கேடகரி படிவம்
படி 3: அடிப்படை விவரங்களை உள்ளிடுதல்
- Name புலத்தில் கேடகரியின் பெயரை உள்ளிடவும்
- இந்த புலம் கட்டாயமானது
- எடுத்துக்காட்டு:
Beverages,Starters,Desserts
- Sort Order புலத்தில் இந்த கேடகரி பட்டியலில் எந்த வரிசையில் தோன்ற வேண்டும் என்பதை குறிக்கும் எண்ணை உள்ளிடவும்
- இதுவும் கட்டாயமான புலம்
- குறைந்த எண்ணை வழங்கினால், மெனுவில் முன்புறமாக காணப்படும்
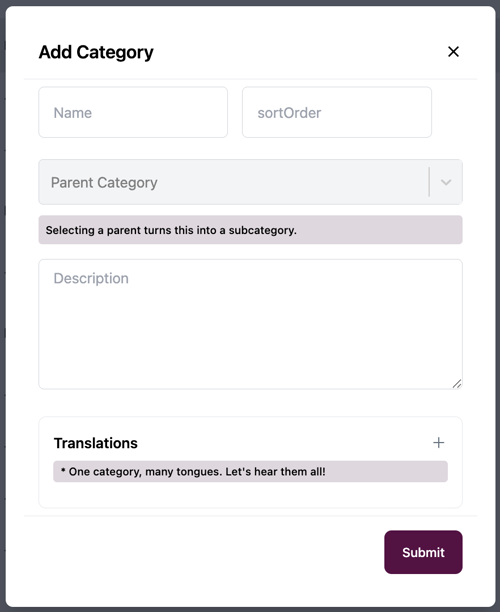
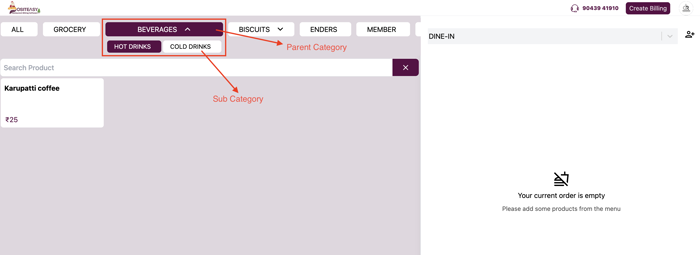
படி 4: பாரென்ட் (parent) கேடகரி தேர்வு (விருப்பத்தேர்வு)
- இந்த கேடகரி சப்-கேடகரியாக இருக்க வேண்டுமெனில்:
- Parent category (Optional) டிராப்-டவுன் பட்டியலைத் திறக்கவும்
- ஏற்கனவே உள்ள ஒரு பாரென்ட் (parent) கேடகரியை தேர்ந்தெடுக்கவும்
- பாரென்ட் (parent) கேடகரி தேர்வு செய்யப்பட்டால், இந்த கேடகரி சப்-கேடகரியாக அமைக்கப்படும்
பாரென்ட் கேடகரி தேவையில்லையெனில்,இந்த புலத்தை காலியாக விடலாம்.
💡 குறிப்பு:
பாரென்ட் கேடகரியில் நேரடியாக பொருட்கள் இருக்காது.
அதன் கீழ் சப்-கேடகரிகள் மட்டுமே இடம்பெறும்.
படி 5: விளக்கம் மற்றும் மொழிபெயர்ப்பு சேர்த்தல் (விருப்பத்தேர்வு)
- Description பகுதியில் கேடகரியைப் பற்றிய சுருக்கமான விளக்கத்தை உள்ளிடலாம்
(உள் பயன்பாடு / டூல்டிப் நோக்கத்திற்கு) - Translations பகுதியில்:
- + ஐகானைத் தேர்ந்தெடுக்கவும் பல மொழி மெனு தேவையெனில்,
வேறு மொழிகளில் கேடகரி பெயர்களை சேர்க்கலாம்
- + ஐகானைத் தேர்ந்தெடுக்கவும் பல மொழி மெனு தேவையெனில்,
படி 6: கேடகரியை சமர்ப்பித்தல்
- Submit பொத்தானைத் தேர்ந்தெடுக்கவும்
- கீழ்கண்ட அம்சங்களை உறுதிப்படுத்தவும்:
- பொருட்களை உருவாக்கும் அல்லது திருத்தும் போது, இந்த கேடகரியை தேர்வு செய்ய முடியுகிறதா
- இன்வென்டரியில் உள்ள கேடகரிகள் பட்டியலில் புதிய கேடகரி காணப்படுகிறதா
பார்க்கவும்:
புதிய ப்ராடக்ட் சேர்த்தல்